

How to Download SharePoint Recycle Bin as a CSV (No PowerShell Needed)
Dealing with the SharePoint Recycle Bin can be a hassle, especially when you need to audit its contents without PowerShell or admin access.
A seasoned Techno-Functional Professional with 7+ years of experience in Information Technology (IT), specializing in Microsoft Dynamics 365 Customer Engagement (CE) and Power Platform Solutions. I bring extensive expertise in out-of-the-box and custom configurations, customizations, integrations and data migrations. My skill set includes proficiency in working with Model Driven Apps, Canvas Apps, Power Pages (formerly Power Portals), Power Automate, Approval flows, Code Activities, Plugins, Workflows, Business Rules, JavaScript, HTML Web Resources, PCF Controls, Chatbots, SSRS Reports, Microsoft Copilot, Azure OpenAI, Azure Web Services, Azure Functions, Azure Logic Apps, Blazor Web Assemblies, C# and requirement analysis.
Auditing the SharePoint Recycle Bin is difficult without PowerShell or administrative permissions. This guide offers a simple, non-destructive method to download a complete list of deleted items as a CSV, using just a small JavaScript code snippet in your browser's developer console.
This method is perfect for site owners or users with "Read" permissions who need a quick report of what's been deleted.
What You'll Need
A web browser: Chrome, Edge, or Firefox.
Access to your SharePoint site: You must be logged in with sufficient permissions to view the Recycle Bin.
The JavaScript code snippet: Provided below.
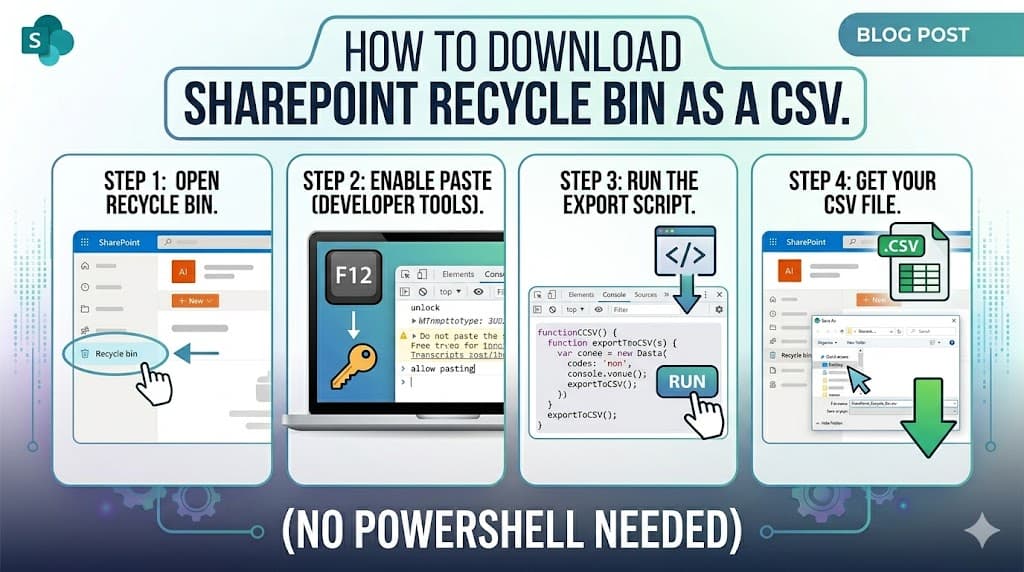
Step 1: Navigate to the SharePoint Recycle Bin
First, open your web browser and go to your SharePoint site's Recycle Bin. You can usually find this by going to Site Contents and clicking Recycle Bin at the top right of the page.
Your URL will look something like this: https://yourdomain.sharepoint.com/sites/<YourSite>/_layouts/15/RecycleBin.aspx

Step 2: Open the Developer Console (F12)
Now, we need to access the browser's developer tools. This is where we'll paste and run our code.
On Windows, press F12 or Ctrl + Shift + I.
On macOS, press Cmd + Option + I.
This will open the Developer Tools panel. Click on the Console tab.

Step 3: Enable Paste in the Console
For security reasons, some browsers (like Chrome and Edge) will prevent you from pasting code directly into the console. You'll see a warning message like "Do not paste code here unless you understand what you're doing."
To bypass this, you'll need to type allow pasting or a similar command into the console and hit Enter. Follow the specific instructions provided in the warning message to enable pasting.

Step 4: Paste and Customize the Code
Copy the following JavaScript code snippet. This script is designed to page through the SharePoint API, retrieve all items from the Recycle Bin, and then automatically compile and download a CSV file.
async function getAllRecycleBinItems() {
  // ⚙️ USER CONFIGURATION: Update these variables for your specific needs
  const siteUrl = "https://yourOrg.sharepoint.com/sites/accounting"; // Your SharePoint site URL
  const rowLimit = 5000; // Number of items to fetch per API call (max 5000)
  const itemState = 1; // 1 for first-stage recycle bin, 2 for second-stage

  // 🤖 DO NOT EDIT THE CODE BELOW THIS LINE
  let all = []; // Array to store all collected Recycle Bin items
  let keepOnRunning = true;
  let lastRecordId = null; // Used for paging: ID of the last item in the previous result set
  let lastRecordTitle = null; // Used for paging: Title of the last item
  let lastRecordDeletedDate = null; // Used for paging: DeletedDate of the last item
  let currentPage = 1; // Counter for logging progress

  try {
    // Construct URL for the first page fetch
    let url = `\({siteUrl}/_api/web/GetRecycleBinItemsByQueryInfo(rowLimit=@a1,isAscending=@a2,itemState=@a3,orderby=@a4,ShowOnlyMyItems=@a5)?@a1='\){rowLimit}'&@a2=false&@a3=${itemState}&@a4=3&@a5=false`;

    console.log(`Starting to retrieve items from the Recycle Bin at: ${siteUrl}`);
    const resp = await fetch(url, {
      headers: { "Accept": "application/json;odata=verbose" }
    });

    if (!resp.ok) {
      // Check for a non-200 HTTP status code and throw an error
      throw new Error(`HTTP error! status: ${resp.status}`);
    }

    const data = await resp.json();
    // Navigate the JSON response to find the results array
    const page = data?.d?.GetRecycleBinItemsByQueryInfo || data?.d;
    let results = page?.results || [];

    if (results.length > 0) {
      // Map the results to a new array with only the required properties
      const selected = results.map(item => ({
        Title: item.Title,
        DirName: item.DirName,
        DeletedByName: item.DeletedByName,
        DeletedDate: item.DeletedDate,
        ItemType: item.ItemType,
        Size: item.Size
      }));
      all.push(...selected); // Add the mapped items to the main array
    }

    console.log(`✅ Page \({currentPage} fetched. Retrieved \){results.length} items. Total so far: ${all.length}.`);

    // Check if there are more pages to fetch
    if (results.length === rowLimit) {
      // Get the last item's details for the next page's URL
      lastRecordId = results[rowLimit - 1].Id;
      // Replace single quotes in the title to prevent URL errors
      lastRecordTitle = results[rowLimit - 1].Title.replace(/'/g, "%27");
      lastRecordDeletedDate = results[rowLimit - 1].DeletedDate.replace("Z", "");
    } else {
      keepOnRunning = false; // No more pages to fetch
    }

    // Loop to fetch all subsequent pages
    while (keepOnRunning) {
      currentPage++;
      // Encode the paging values for the URL
      const encodedId = encodeURIComponent(lastRecordId);
      const encodedTitle = encodeURIComponent(lastRecordTitle);
      const encodedDate = encodeURIComponent(lastRecordDeletedDate);
      // Construct the PagingInfo string
      const pagingInfo = `id=\({encodedId}&title=\){encodedTitle}&searchValue=${encodedDate}`;

      // Construct URL for subsequent pages, including the encoded PagingInfo
      let url2 = `\({siteUrl}/_api/web/GetRecycleBinItemsByQueryInfo(rowLimit=@a1,isAscending=@a2,itemState=@a3,orderby=@a4,pagingInfo=@a5,ShowOnlyMyItems=@a6)?@a1='\){rowLimit}'&@a2=false&@a3=\({itemState}&@a4=3&@a5='\){encodeURIComponent(pagingInfo)}'&@a6=false`;

      try {
        const resp2 = await fetch(url2, {
          headers: { "Accept": "application/json;odata=verbose" }
        });

        if (!resp2.ok) {
          throw new Error(`HTTP error! status: ${resp2.status}`);
        }

        const data2 = await resp2.json();
        const page2 = data2?.d?.GetRecycleBinItemsByQueryInfo || data2?.d;
        results = page2?.results || [];

        if (results.length > 0) {
          const selected = results.map(item => ({
            Title: item.Title,
            DirName: item.DirName,
            DeletedByName: item.DeletedByName,
            DeletedDate: item.DeletedDate,
            ItemType: item.ItemType,
            Size: item.Size
          }));
          all.push(...selected);
        }

        console.log(`✅ Page \({currentPage} fetched. Retrieved \){results.length} items. Total so far: ${all.length}.`);

        if (results.length === rowLimit) {
          lastRecordId = results[rowLimit - 1].Id;
          lastRecordTitle = results[rowLimit - 1].Title.replace(/'/g, "%27");
          lastRecordDeletedDate = results[rowLimit - 1].DeletedDate.replace("Z", "");
        } else {
          keepOnRunning = false;
        }

      } catch (error) {
        // Log the specific error for this page and stop the loop
        console.error(`❌ An error occurred during page ${currentPage} retrieval:`, error);
        keepOnRunning = false;
      }
    }

    console.log(`\n🎉 All items have been retrieved.`);
    console.log(`Final retrieved records count: ${all.length}.`);

    if (all.length > 0) {
      // Prepare data for CSV
      const headers = Object.keys(all[0]).join(",");
      const rows = all.map(obj =>
        // Format each value, handling commas and quotes within the data
        Object.values(obj).map(v => `"${String(v).replace(/"/g, '""')}"`).join(",")
      );
      const csv = [headers, ...rows].join("\n");

      // Trigger the browser to download the CSV file
      const blob = new Blob([csv], { type: "text/csv" });
      const link = document.createElement("a");
      link.href = URL.createObjectURL(blob);
      link.download = "RecycleBinItems.csv";
      document.body.appendChild(link);
      link.click();
      document.body.removeChild(link);

      console.log(`⬇️ CSV downloaded with ${all.length} records.`);
    }

  } catch (error) {
    // Log any errors from the initial fetch or overall process
    console.error("❌ An error occurred:", error);
    console.log("Process terminated due to an error.");
  }
}
getAllRecycleBinItems();
Before pasting, you must customize the siteUrl variable at the top of the code to match your SharePoint site. For example, if your site is at https://yourcompany.sharepoint.com/sites/accounting, change the line to:
const siteUrl = "https://yourcompany.sharepoint.com/sites/accounting";

Step 5: Run the Code
After pasting the code, press Enter.
The script will immediately begin to run. You will see progress messages in the console, showing how many items have been fetched on each page. The process will continue automatically, retrieving pages of up to 5,000 items at a time.
Once the script has fetched all the items, you will see a final success message in the console.

Step 6: Download the CSV File
After the final message appears, your browser will automatically prompt you to save a file named RecycleBinItems.csv.
If your browser blocks the download, you may need to check your browser's download settings or a pop-up blocker. The console will also log a message, ⬇️ CSV downloaded..., confirming the action.
Open the downloaded file in a spreadsheet program like Microsoft Excel or Google Sheets to view all your SharePoint Recycle Bin items, including their titles, deletion dates, and who deleted them.
That's it! You've successfully exported your SharePoint Recycle Bin contents without needing any administrative tools or special software.
Conclusion
By using this straightforward JavaScript approach, you can efficiently bypass the typical limitations of SharePoint's user interface, which often hides important data behind multiple clicks and lacks an export function. This method empowers you to quickly generate an auditable record of all deleted files and items, providing valuable insights into a site's history and helping you manage its content more effectively. This technique demonstrates how a few lines of code can solve a common problem, offering a powerful alternative to complex administrative tools and saving you time.